AuthFi Installation Guide
AuthFi is an end-to-end FIDO server. You can use it to strength your company security or provide your customers an easy way to login that doesn’t compromise on safety.
Current Version: v2.1.2.49
AuthFi role is to store the public keys of anyone who enrolled in your company or service with a passkey and issue challenges once they attempt to login.
Requirements
AuthFi Server
CPU: 2 vCPUs
Memory: 16 GB
Disk Space: 60 GB
OS: CentOS Stream 10 or Miracle Linux 10 or above version
HTTPS SSL certificate and private key of AuthFi Server
Nginx as Reverse Proxy
External internet connectivity is required during the installation process to install third-party packages:
MongoDB
JAVA OpenJDK 21 (JRE)
tomcat9
Firewall Rules (These rules will set during installation)
firewall-cmd --permanent --zone=public --add-service=http
firewall-cmd --permanent --zone=public --add-service=https
firewall-cmd --permanent --zone=public --add-port=8080/tcp
setsebool -P httpd_can_network_connect on
setsebool -P tomcat_can_network_connect_db on
LicenseKey File
If you don't have the LicenseKey file yet, please contact the AuthenTrend team with the information below, and we will provide your LicenseKey file.
IMPORTANT
Do NOT use localhost URLs for AuthFi URL and ATKey.Login URL.
AuthFi URL and ATKey.Login URL can NOT be the same.
ATKey.Login Admin Email can NOT be the same as AuthFi Admin Email.
Limitation Rule:
Max Users (or Max Authentications)
Expiration Date (Based on PoC Phase or the PO)
Server Information:
Company Name
AuthFi (FIDO Server) URL
AuthFi Admin Email(s)
ATKey.Login URL
ATKey.Login Admin Email(s)
License Expiration Reminder: We’ll send you friendly reminders when your license is about to expire — 2 months, 1 month, and 3 days before. Make sure your admin email is correct so you won’t miss them.
Firewall Rules
| From | To | Protocol/Port | Purpose |
|---|---|---|---|
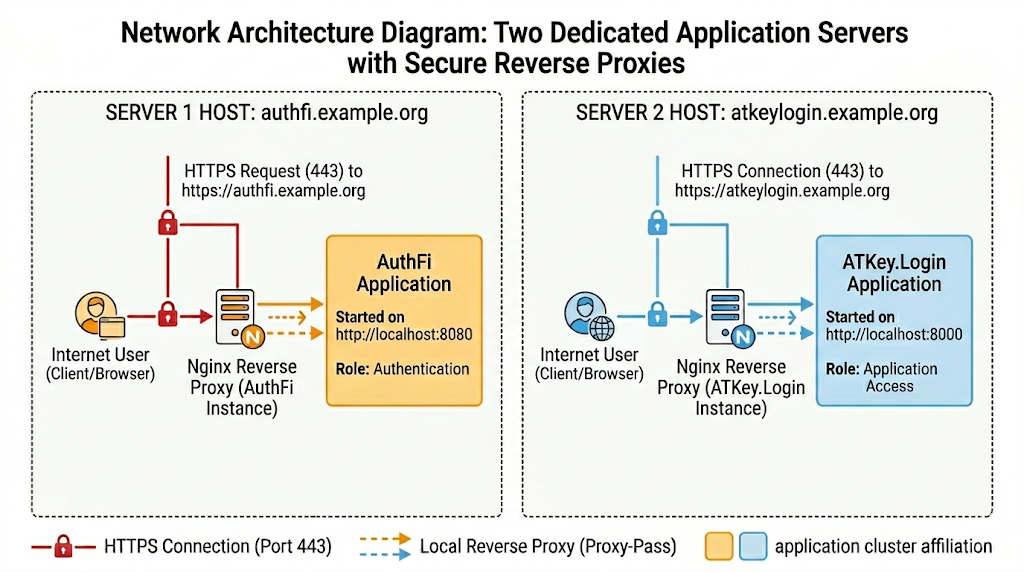
| Browser/Windows Client | Reverse Proxy for ATKey.Login (Nginx) | TCP 443 | Server Admin / Windows Login |
| Reverse Proxy for ATKey.Login | ATKey.Login Application | TCP 8000 | Reverse Proxy |
| ATKey.Login Application | PostgreSQL | TCP 5432 | Database (Docker Internal) |
| ATKey.Login Application | Redis | TCP 6379 | Cache (Docker Internal) |
| ATKey.Login Application | Reverse Proxy for AuthFi (Nginx) | TCP 443 | Data Exchange |
| Browser | Reverse Proxy for AuthFi (Nginx) | TCP 443 | Server Admin |
| Reverse Proxy for AuthFi | AuthFi Application | TCP 8080 | Reverse Proxy |
| AuthFi Application | MongoDB | TCP 27017 | Database |
HTTPS Certificates
Both ATKey.Login & AuthFi servers need HTTPS certificates in order to function. There are multiple ways to generate these certificates.
Supported formats are: .cer, .crt, .pem, .der.
If you are testing ATKey.Login you may want to start using a self-signed certificate. You can learn how to make your own here.
IMPORTANT: In order to function ATKey.Login and AuthFi require the certificates to be placed in the correct place:
| Method | Use Case | Certificate Authorities | Import ROOT CA |
|---|---|---|---|
| Self-signed | Local testing only (Free) | None | Required (Step 1-6) |
| Let’s Encrypt | Public websites (Free) | Let’s Encrypt | None |
| Public CA | High-security production (Paid) | DigiCert, Sectigo, GlobalSign, GoDaddy | None |
| Cloud Managed | Infrastructure level (Paid) | AWS, Azure, Google Cloud | None |
| Private CA | Internal company (Corporate hosted) | HashiCorp Vault, Microsoft AD CS | Required |
Reverse Proxy
Both ATKey.Login and AuthFi require the setup of a reverse proxy in order to work. We suggest you use Nginx for best compatibility. Here is a complete guide on how to set up the reverse proxy properly.
AuthFi Installation
1.1
Download and extract AuthFi installation Package.
AuthFi Current Version: v2.1.2.49
SHA 256: 8f8718d0cf0c06136856272a597ae45e80d855315249fdbe797829145f87e8a6
Last Updated: 2026-01-20
1.2
Find the file “setenv.sh” and fill the SERVER_URL field.
Do not add https:// before the server URL.
Leave MONGODB_USER and MONGODB_CRED blank.
1.3
Move the LicenseKey File “AuthFi.out” into the folder “installation”.
If you don’t have a LicenseKey File, check the requirements or contact us.
1.4
Run the installation script:
cd installationsudo ./install.sh1.5
Enter the authorization credentials for AuthFi database (Mongo DB).
1.6
At completed installation you will be shown a message like the following one. Check the output information and if there are any mismatches please contact us.
The installation is completed. Please confirm the following server information.

AuthFi URL: xxxxxxxxxxxxx
RP Admin Email: xxxxxxxxxxxxx
AuthFi Admin Email: xxxxxxxxxxxxx
AUTHFI_APIPATH: xxxxxxxxxxxxx
AUTHFI_ACCESSPOINT: xxxxxxxxxxxxx
Please enter xxxxxx as the recovery verification code.
CRITICAL: Please write down your ATKey.Login Recovery Verification Code it will be needed for the admin activation.
COMMON INSTALLATION FAILURE MESSAGES:
Invalid License File. Please copy the correct AuthFi.out file into the installation folder and run the installation script again.
Check that AuthFi.out is the correct file (Step 2.3)
Initialize the database.
Initial DB succeed Error: Failed to insert license files.
Failed to initialize the database.
Make sure that the LicenseKey file is in the right folder. (Step 2.3)
Installation Complete
If you installed AuthFi as a component for ATKey.Login please proceed to the ATKey.Login User Guide.