

ATKey.Login Installation Guide (on Premise)
ATKey.Login is a simple solution to make your Windows PC login passwordless by tying it to your ATKey in three quick steps.
No need for Entra ID subscription.
Current Version: f2.2.12p v2.3.6
ATKey.Login leverage FIDO2 hmac secret extension to make you login in your PC with just a touch.

ATKey.Login
ATKey.Login Current Version: f2.2.12p v2.3.6
SHA 256: a15bf991e8f1039637e72c34b4c7bf65b0269eaf10b5db09b483b021e9c41d24
Last Updated: 2026-08-14
AuthFi
Current Version: v2.1.2.54
SHA 256: 986382e65220dac7d2299e066481b28da78de0ff701de3373d9158e1ac96a3d7
Last Updated: 2026-06-18
ATKey.Login System Architecture
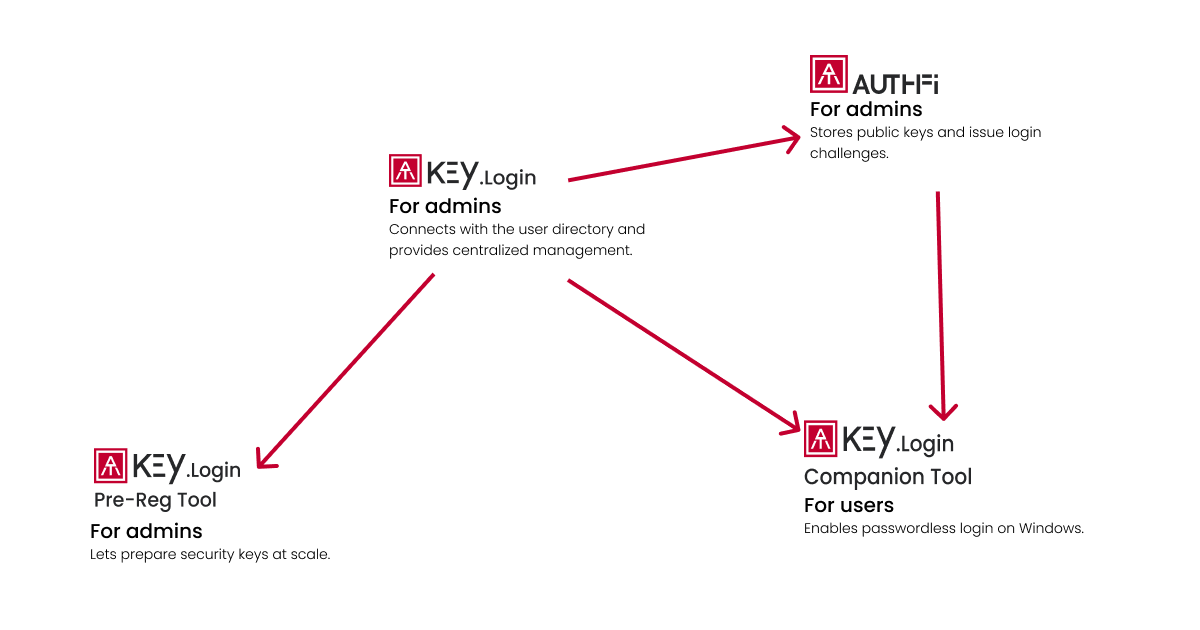
Requirements
ATKey.Login Server
CPU: 2 vCPUs
Memory: 16 GB
Disk Space: 60 GB
OS: CentOS Stream 10 or Miracle Linux 10 or above version
HTTPS SSL certificate and private key of ATKey.Login Server
Nginx as Reverse Proxy
External internet connectivity is required during the installation process to install third-party packages.
jq (Command-line JSON processor)
JAVA OpenJDK 21 (JDK)
yum-utils
docker-ce
ATKey.Login image file
Firewall Rules (These rules will set during installation)
firewall-cmd —permanent —zone=public —add-service=http
firewall-cmd —permanent —zone=public —add-service=https
firewall-cmd —permanent —zone=public —add-port=8000/tcp
setsebool -P httpd_can_network_connect on
AuthFi Server
CPU: 2 vCPUs
Memory: 16 GB
Disk Space: 60 GB
OS: CentOS Stream 10 or Miracle Linux 10 or above version
HTTPS SSL certificate and private key of AuthFi Server
Nginx as Reverse Proxy
External internet connectivity is required during the installation process to install third-party packages:
MongoDB
JAVA OpenJDK 21 (JRE)
tomcat9
Firewall Rules (These rules will set during installation)
firewall-cmd --permanent --zone=public --add-service=http
firewall-cmd --permanent --zone=public --add-service=https
firewall-cmd --permanent --zone=public --add-port=8080/tcp
setsebool -P httpd_can_network_connect on
setsebool -P tomcat_can_network_connect_db on
LicenseKey File
If you don't have the LicenseKey file yet, please contact the AT team with the information below, and we will provide your LicenseKey file.
IMPORTANT
Please do NOT use localhost URLs for AuthFi URL and ATKey.Login URL.
AuthFi URL and ATKey.Login URL can NOT be the same.
ATKey.Login Admin Email can NOT be duplicate with AuthFi Admin Email.
Based on the information you have provided to AT Team, the LicenseKey file includes below information:
Limitation Rule:
Max Users (or Max Authentications)
Expired Date (Based on PoC Phase or the PO)
Server Infomation:
Company Name
AuthFi (FIDO Server) URL
AuthFi Admin Email(s)
ATKey.Login URL
ATKey.Login Admin Email(s)
License Expiration Reminder: We’ll send you reminders when your license is about to expire — 2 months, 1 month, and 3 days before. Make sure your admin email is correct so you won’t miss them.
Firewall Rules
| From | To | Protocol/Port | Purpose |
|---|---|---|---|
| Browser/Windows Client | Reverse Proxy for ATKey.Login (Nginx) | TCP 443 | Server Admin / Windows Login |
| Reverse Proxy for ATKey.Login | ATKey.Login Application | TCP 8000 | Reverse Proxy |
| ATKey.Login Application | PostgreSQL | TCP 5432 | Database (Docker Internal) |
| ATKey.Login Application | Redis | TCP 6379 | Cache (Docker Internal) |
| ATKey.Login Application | Reverse Proxy for AuthFi (Nginx) | TCP 443 | Data Exchange |
| Browser | Reverse Proxy for AuthFi (Nginx) | TCP 443 | Server Admin |
| Reverse Proxy for AuthFi | AuthFi Application | TCP 8080 | Reverse Proxy |
| AuthFi Application | MongoDB | TCP 27017 | Database |
HTTPS Certificates
Both ATKey.Login and AuthFi servers need HTTPS certificates in order to function. There are multiple ways to generate these certificates.
Supported formats are: .cer, .crt, .pem, .der.
If you are testing ATKey.Login you may want to start using a self-signed certificate. You can learn how to make your own here.
IMPORTANT: In order to function ATKey.Login and AuthFi require the certificates to be placed in the exact folder specified during the installation procedure.
| Method | Use Case | Certificate Authorities | Import ROOT CA |
|---|---|---|---|
| Self-signed | Local testing only (Free) | None | Required (Step 1-6) |
| Let’s Encrypt | Public websites (Free) | Let’s Encrypt | None |
| Public CA | High-security production (Paid) | DigiCert, Sectigo, GlobalSign, GoDaddy | None |
| Cloud Managed | Infrastructure level (Paid) | AWS, Azure, Google Cloud | None |
| Private CA | Internal company (Corporate hosted) | HashiCorp Vault, Microsoft AD CS | Required |
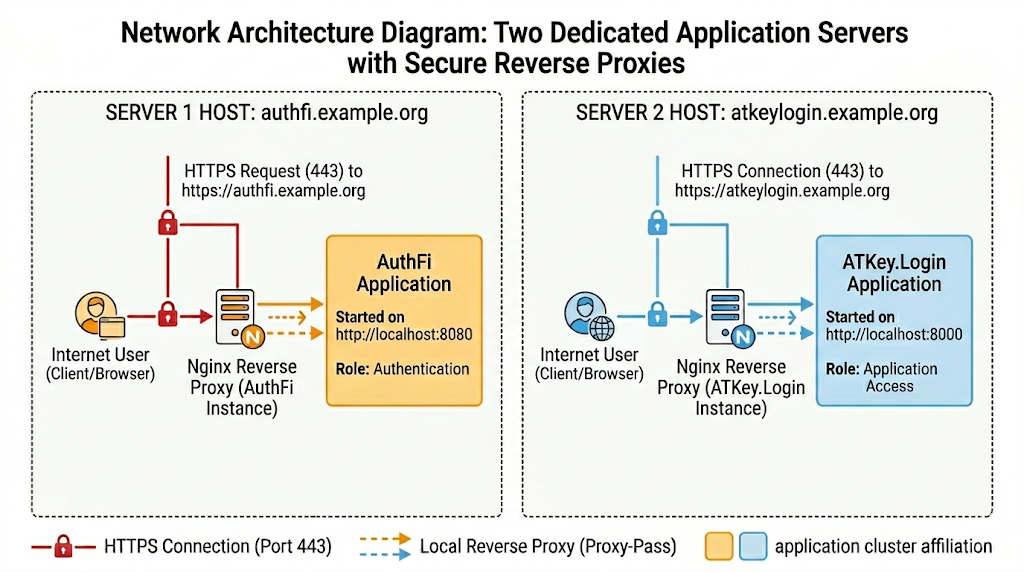
Reverse Proxy
Both ATKey.Login and AuthFi require the setup of a reverse proxy in order to work. We suggest you use Nginx for best compatibility. Here is a complete guide on how to set up the reverse proxy properly.
ATKey.Login Installation
1.1
Download the Installation Package.
1.2
Create a directory.
sudo mkdir -p /www/atkeylogin1.3
Move the files in the directory. The Installation Package, LicenseKey File, and HTTPS certificate need to be located in /www/atkeylogin.
1.4
Run the installation script.
sh install.shAfter successful installation, you can check the recovery verification code (Magic Code for admin) as follow:
admin@authentrend.com
INSERT 0 1
Admin user admin@authentrend.com inserted successfully.
admin+1@authentrend.com
INSERT 0 1
Admin user admin+1@authentrend.com inserted successfully.
admin+2@authentrend.com
INSERT 0 1
Admin user admin+2@authentrend.com inserted successfully.
Please enter xxxxxx as the recovery verification code.
CRITICAL: Write down your ATKey.Login Recovery Verification Code. It will be needed for the admin activation.
1.5
Verify the installation
sudo docker psIf successfull the response will be:
CONTAINER ID   IMAGE                                          COMMAND                   CREATED        STATUS        PORTS                                         NAMES
b39fd3b08fc9   authentrendtech/atkeylogin-provision:v2.0.10   "java --add-opens ja…"   15 hours ago   Up 15 hours   0.0.0.0:8000->8000/tcp, [::]:8000->8000/tcp   app
c3a2b171b3a3   redis:alpine                                   "docker-entrypoint.s…"   35 hours ago   Up 15 hours   0.0.0.0:6379->6379/tcp, [::]:6379->6379/tcp   redis6969
26ea3ad4d7d3   postgres:13.1-alpine                           "docker-entrypoint.s…"   35 hours ago   Up 15 hours   0.0.0.0:5432->5432/tcp, [::]:5432->5432/tcp   db
1.6
Place the AuthFi HTTPS certificate and ROOT CA into /www/atkeylogin folder.
Run:
sh updateTruststore.sh Making sure there is a file called truststore.jks generated under the /www/atkeylogin folder.
If there’s the "400 Bad Request" is an SSL trust issue. Even with a reverse proxy, internal communication between ATKey.Login and AuthFi must use HTTPS.
Please follow these steps to resolve the issue:
Transfer Certificate: Place the AuthFi root certificate into the ATKey.Login server path (/www/atkeylogin).
Update TrustStore: Execute "updateTrustStore.sh". This allows the ATKey.Login Java environment to trust the AuthFi server.
Confirm https: Ensure ATKey.Login is configured to point to the HTTPS URL of the AuthFi server.
AuthFi Installation
2.1
On a different machine, download and extract AuthFi installation Package.
2.2
Find the file “setenv.sh” and fill the SERVER_URL field.
Do not add https:// before the server URL.
Leave MONGODB_USER and MONGODB_CRED blank.
2.3
Move the LicenseKey File “AuthFi.out” into the folder “installation”.
If you don’t have a LicenseKey File, check the requirements or contact us.
2.4
Run the installation script:
cd installationsudo ./install.sh2.5
Enter the authorization credentials for AuthFi database (Mongo DB).
Please enter the AuthFi database administrator account:
Please enter the AuthFi database administrator password:
2.6
At completed installation you will be shown a message like the following one. Check the output information and if there are any mismatches please contact us.
The installation is completed. Please confirm the following server information.

AuthFi URL: xxxxxxxxxxxxx
RP Admin Email: xxxxxxxxxxxxx
AuthFi Admin Email: xxxxxxxxxxxxx
AUTHFI_APIPATH: xxxxxxxxxxxxx
AUTHFI_ACCESSPOINT: xxxxxxxxxxxxx
Please enter xxxxxx as the recovery verification code.
CRITICAL: Please write down your ATKey.Login Recovery Verification Code it will be needed for the admin activation.
COMMON INSTALLATION FAILURE MESSAGES:
Invalid License File. Please copy the correct AuthFi.out file into the installation folder and run the installation script again.
Check that AuthFi.out is the correct file (Step 2.3)
Initialize the database.
Initial DB succeed Error: Failed to insert license files.
Failed to initialize the database.
Make sure that the LicenseKey file is in the right folder. (Step 2.3)
Installation Complete
You can now move to our User Guide to set up the software and commence operations.
Changelog
-
Only the admin access can remove the client tool App.
Optimized the error message.
-
Security Hardening: Discontinued SendGrid as a verification method.
Direct Authentication: Encourages the use of LDAP integration or Magic Codes for more secure, internal-only user verification.
-
Simplified Admin Setup — New “Magic Code” binding streamlines installation and service entry.
LDAP Connection Integration — Sync users directly from enterprise directories.
Email Delivery Test — Verify whether enterprise mail servers can receive ATKey.Login system emails.
-
Builds on v2.0 with SecurityKey Pre-Reg (A tool dedicated for IT Admin)
Admin can pre-register ATKeys, assign them to users, and set PIN codes
Users only need to enroll their fingerprint to start using ATKey.Login
-
Admin uploads both user list and key list; only listed users and keys can be used
Admin can add/delete users and keys, and unassign ATKeys for offboarded staff
Users still need to activate accounts and register ATKeys themselves
-
Admin generates activation codes; users self-register via web console
Admin can only view registration status and suspend user access
No restriction on ATKey usage; users register their own keys